How to Launch a Glamping Site with Yurts: A Clear 5-Step Guide
Starting a glamping site with yurts is about more than setting up structures — it’s about building an experience, ensuring viability, and establishing a business that guests will return to year after year. Here’s a streamlined, practical roadmap tailored specifically for yurt retreats.
Step 1: Define Your Vision & Validate the Concept
Begin with clarity before committing to infrastructure.
Identify your guest type: Couples seeking romance? Families? Wellness retreats? Your ideal guest will shape everything from décor to pricing.
Match your land to your offering: Think about how views, woodland, water, or open fields can enhance the guest experience.
Check financial viability: Project costs and income to ensure your plan is realistic and sustainable.
A strong vision helps prevent costly changes later.
Step 2: Assess Feasibility & Planning Permissions
A great idea must align with regulations and practical constraints.
Review planning requirements: Check if your land is within protected zones or subject to restrictions.
Map out potential site layout: Determine how many yurts you can comfortably and responsibly place, with access paths and guest zones.
Consult professionals if needed: A planning consultant familiar with tourism projects can pre-empt objections and streamline approvals.
This step ensures your dream is genuinely buildable.
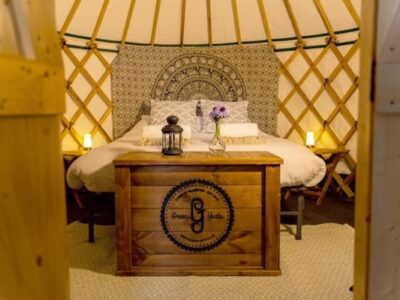
Step 3: Design & Specify Your Yurts
Now turn concept into guest-ready accommodation.
Select your basic yurt model Choose from common sizes such as 10′, 12′, 14′, or 16′ depending on occupancy, furnishings, and experience level you aim to offer. Check out our premium yurts here.
Plan internal layout & finishes Decide on flooring, insulation, windows, doors, skylights, heating options, and décor style. Design spaces for sleeping, relaxing, and creating memorable stays.
Consider guest experience details Decking, private fire pits, outdoor seating, or skylight views can elevate a yurt from simple shelter to standout escape.
Good design sets the tone for your brand and pricing power.
Step 4: Prepare the Site & Install Structures
With plans in place, it’s time to build.
Prepare ground & access routes: Level pitches, build bases or decks, and ensure pathways are ready for delivery and movement.
Coordinate delivery & assembly: Schedule installation when the site is fully prepped. Ensure anchoring, weatherproofing, and finishing are completed properly.
Quality checks & readiness: Once erected, check each yurt for comfort, safety, and guest readiness before opening.
A well-managed installation prevents delays and early guest issues.
Step 5: Launch, Market & Manage Bookings
Your site is ready — now you need guests.
Set up booking systems: Use your own website, OTAs like Airbnb, or specialist glamping platforms.
Create pricing strategy: Adjust rates seasonally and offer introductory stays to build reviews.
Develop a strong visual identity: Use professional photography and consistent branding to stand out online.
Soft launch: Trial stays help refine service, gather feedback, and build confidence before full opening.
Marketing and service are what turn structures into a thriving retreat.
Final Thoughts
Yurts offer a unique blend of tradition, comfort, and wilderness appeal — but success comes from planning as much as passion. Start with a clear vision, build gradually, and focus on guest experience at every step.